Guía de usuario de PhotoRobot Carpet Studio
Esta guía de usuario detalla el PhotoRobot Carpet Studio con Carousel 3000. Proporciona información detallada e instrucciones para la instalación y funcionamiento funcional del Estudio de Alfombras por parte del cliente. Hay resúmenes del robot Carousel 3000, el software de la aplicación PhotoRobot Controls, la posición de la cámara, el funcionamiento y las etiquetas de información.
Importante: Consulta siempre la Información e Instrucciones de Seguridad de PhotoRobot junto con cualquier documentación proporcionada específicamente para tu dispositivo. Además, la instalación inicial del PhotoRobot Carpet Studio y de cualquier dispositivo PhotoRobot en general debe ser realizada por una autoridad autorizada de PhotoRobot. Estos incluyen un distribuidor aprobado o un representante del propio fabricante.
Nota: Para más información específica sobre el robot Carousel 3000, consulte la Guía de Usuario de PhotoRobot Carousel (Carousel Guide).
Bienvenido a PhotoRobot Carpet Studio
¡Gracias por la compra del PhotoRobot Carpet Studio y enhorabuena! PhotoRobot cuenta con décadas de experiencia profesional, visión e innovación en fotografía automatizada. Tanto elegante como ingenioso, cada producto presume de un diseño que prioriza al cliente y la máxima productividad en el estudio fotográfico. Esto significa que siempre puedes esperar los niveles más altos de precisión, rapidez y estandarización fotográfica en cada uso, en cada uno de tus flujos de trabajo. Bienvenido a tu estudio de alfombras PhotoRobot.
1. Descripción del producto - PhotoRobot Carpet Studio
El Carpet Studio impulsado por PhotoRobot integra el Carousel 3000 como una plataforma de fotografía robótica con controles por software a través de la aplicación PhotoRobot Controls (también llamada "CAPP"). La plataforma robótica del Carousel 3000 es adecuada para la orientación de giro de objetos fotografiados, mientras que la plataforma rotatoria tiene 3 metros de diámetro. Mientras tanto, el motor está separado de la plataforma fotográfica, garantizando un nivel bajo en el suelo.
1.1. Resumen de la máquina - Carousel 3000
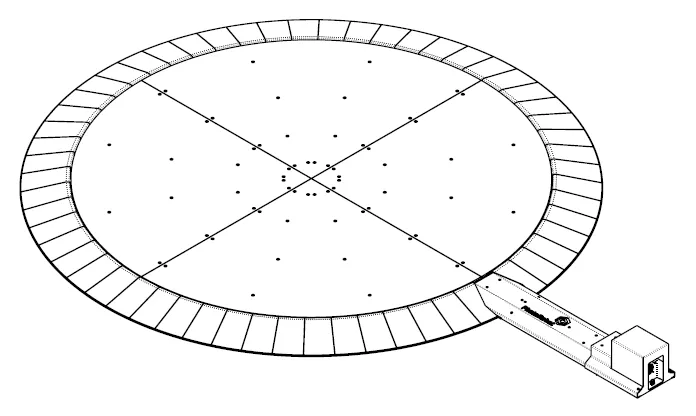
La parte principal del Estudio de Alfombras es la máquina PhotoRobot Carousel 3000 en la versión cuadrada con rampas para automovilización en los lados delantero, izquierdo y derecho.
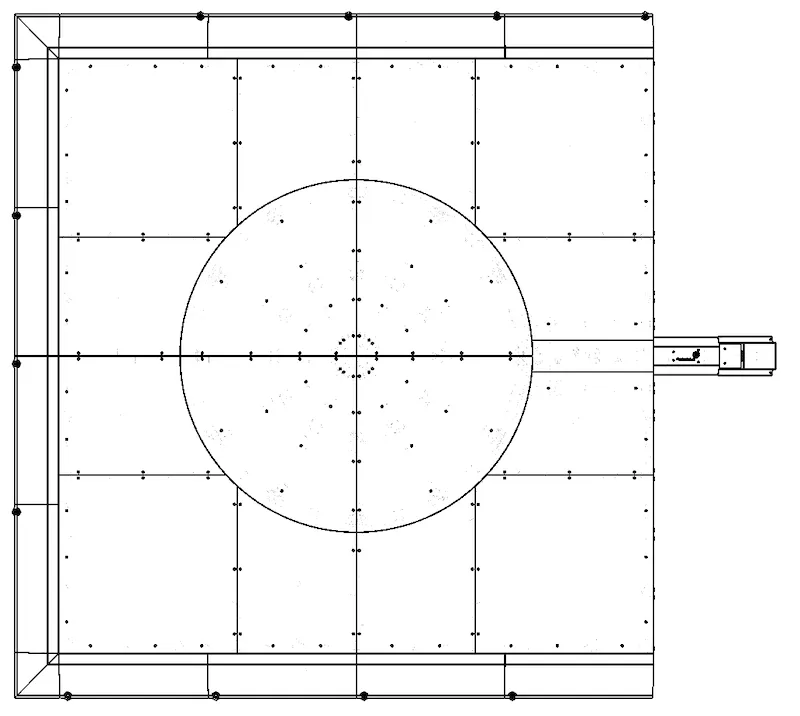
1.2. Componentes principales de la máquina Carousel 3000
Los componentes principales del Carousel 3000 se encuentran en las siguientes infografías que etiquetan las partes 1 - 7.
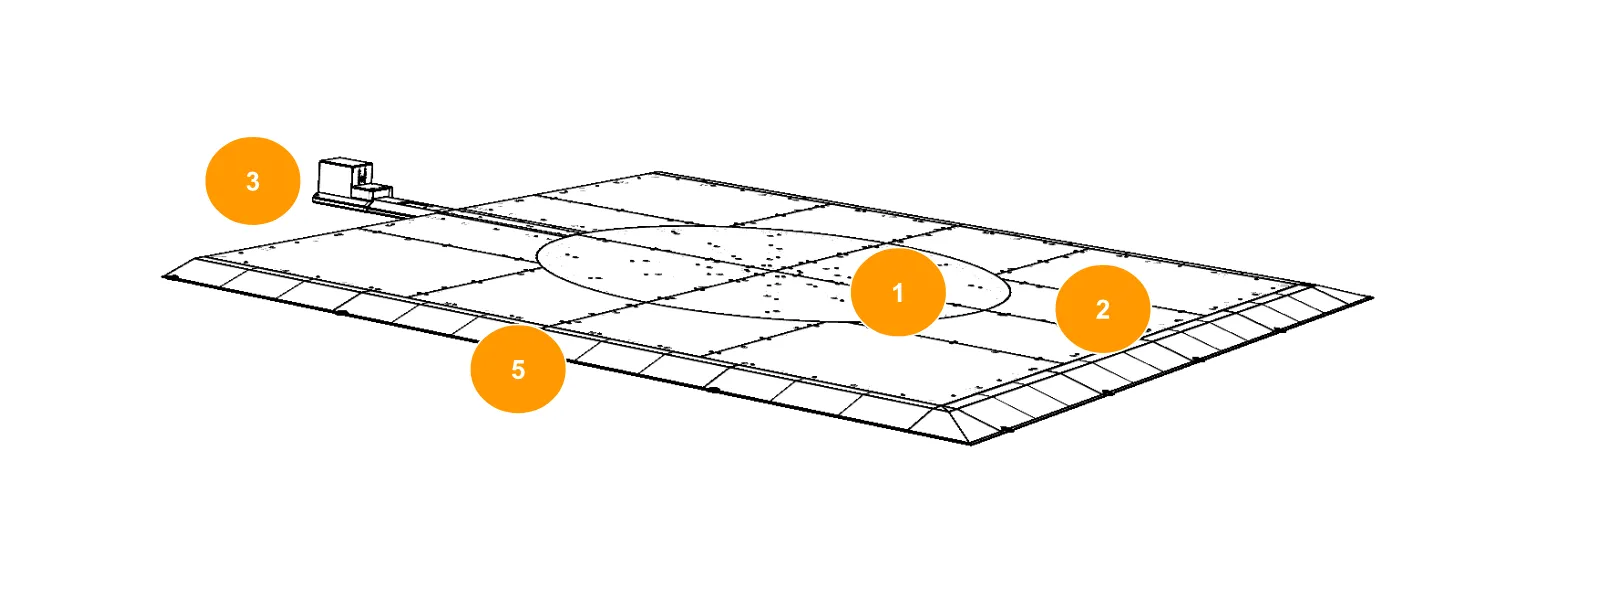
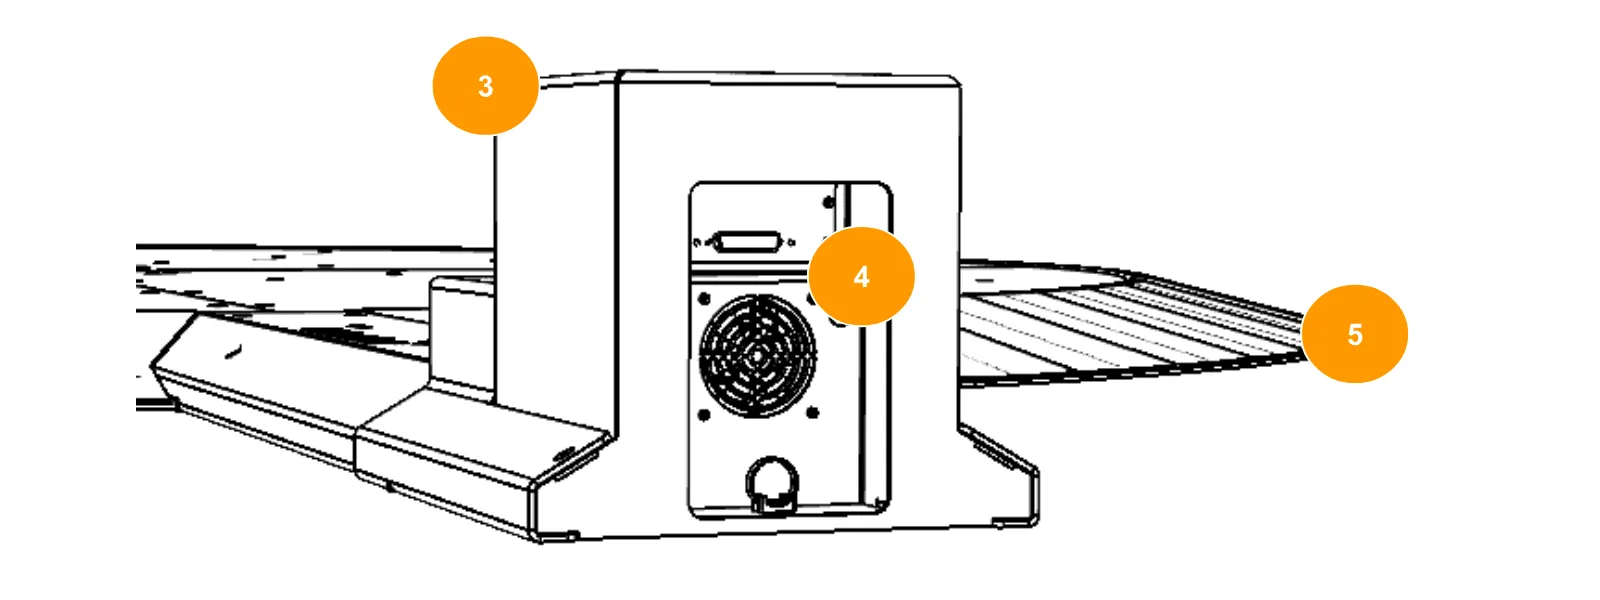
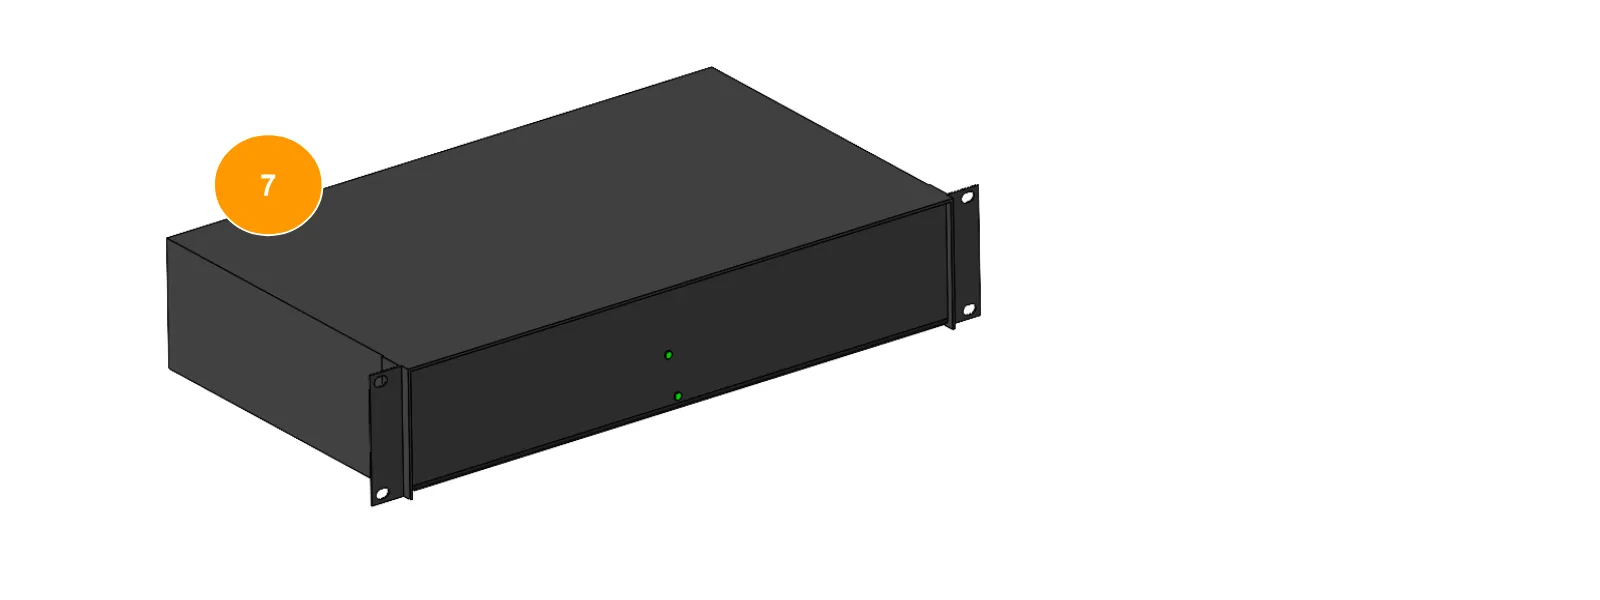
- Plataforma giratoria (1)
- Piso de placa (2)
- Conjunto de motor (3)
- Conectores de máquina domo (4)
- Rampas de acceso (5)
- Antecedentes / puntos de conexión del ciclorama (6)
- Unidad de control de rack de 19 pulgadas (7)
Nota: El rack de 19 pulgadas (7) alberga la unidad de control, que se instala horizontalmente en un espacio ventilado para garantizar la refrigeración de los componentes electrónicos.
2. Resumen del software de control - PhotoRobot Controls App
El control de la plataforma y estación de trabajo robótica Carousel 3000 se realiza mediante el software PhotoRobot Controls App (CAPP). CAPP integra el control sobre robots, cámaras, luces de estudio y postproducción. Esto incluye funciones de gestión de flujos de trabajo, así como la funcionalidad necesaria para una automatización eficaz en el postprocesamiento y la publicación de contenido.
Nota: El software de la aplicación PhotoRobot Controls no se entrega con el dispositivo; es una compra separada disponible para descarga a través de tu cuenta de PhotoRobot.
Para apoyo con la instalación y el inicio, consulta la aplicación PhotoRobot Controls: Cómo empezar.
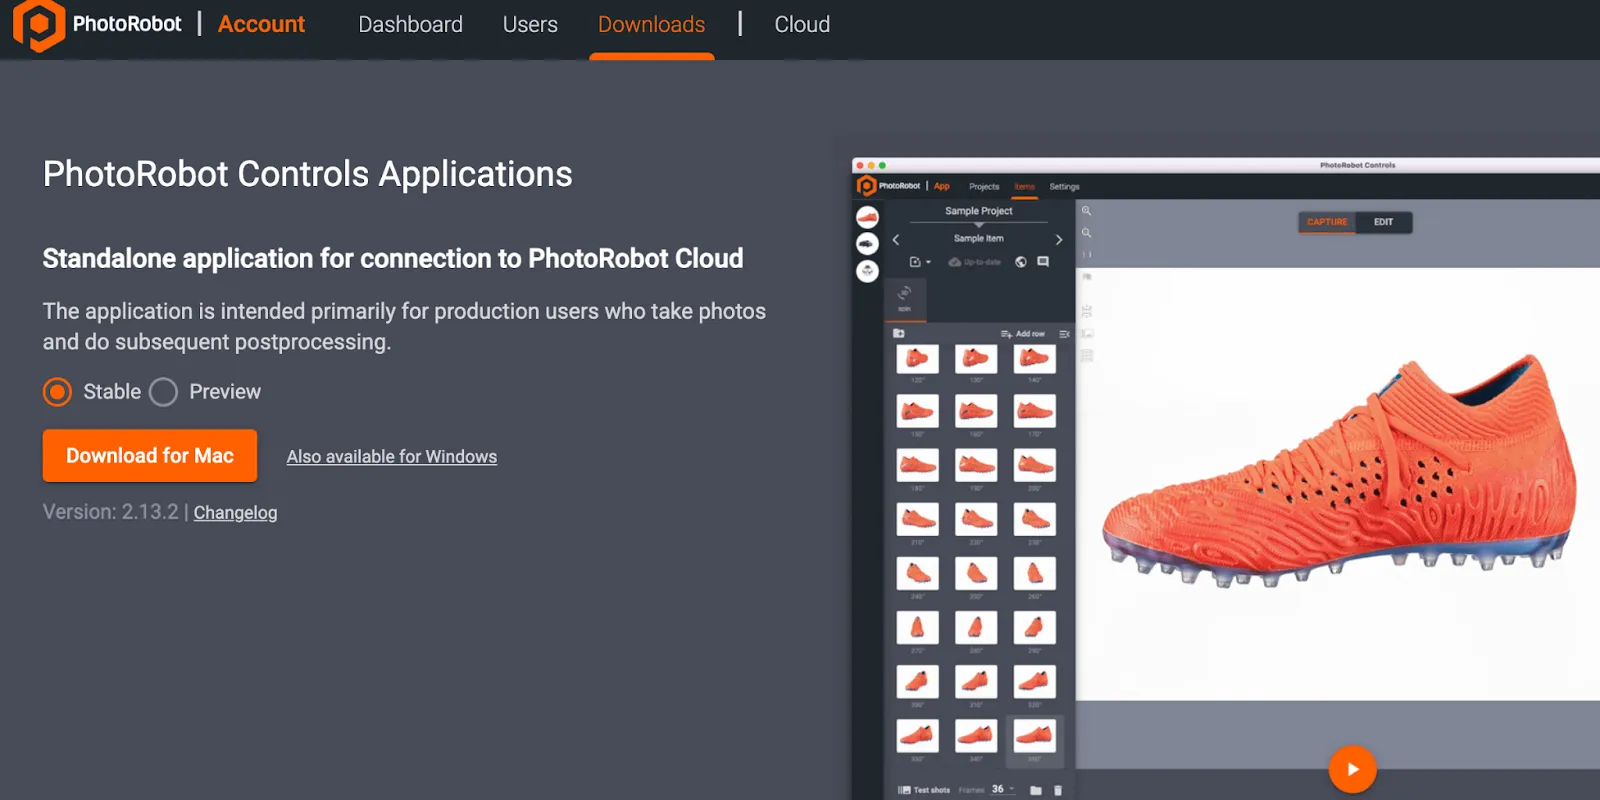
Además, ten en cuenta que el software puede arrancar en "modo asistente" tras la instalación de CAPP. El modo asistente es una interfaz de usuario simplificada que permite escanear códigos de barras para identificar objetos y iniciar automáticamente secuencias de captura. Para información técnica sobre la configuración del modo asistente, consulte la Configuración del Modo Asistente de la App de Control PhotoRobot.
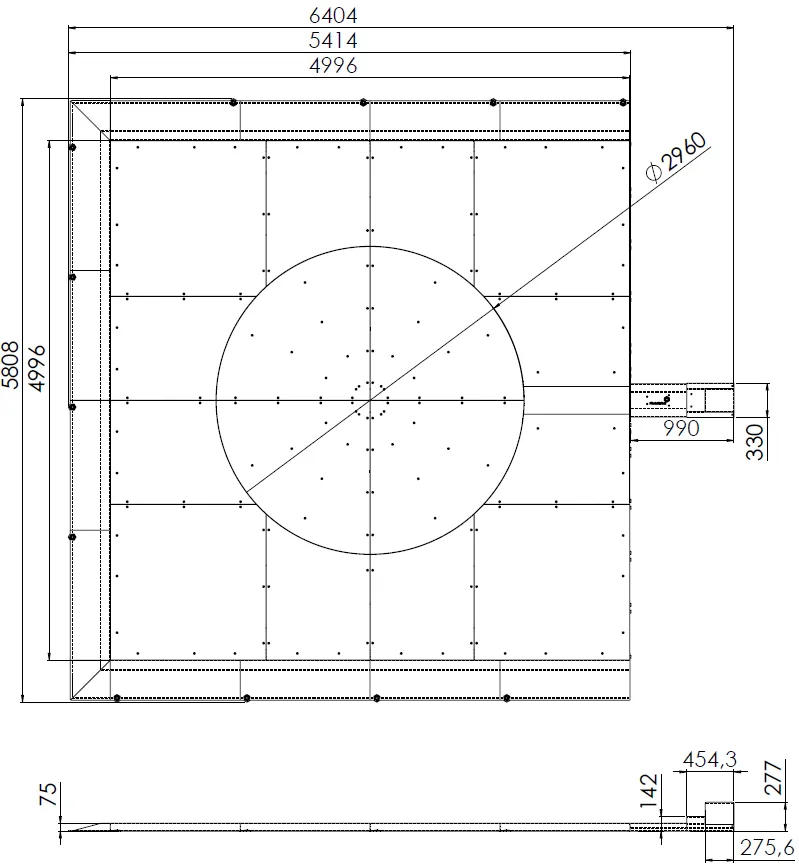
3. Dimensiones de la máquina Carousel 3000
Los siguientes planos técnicos ilustran las dimensiones de la máquina del Carousel 3000 en configuración cuadrada.
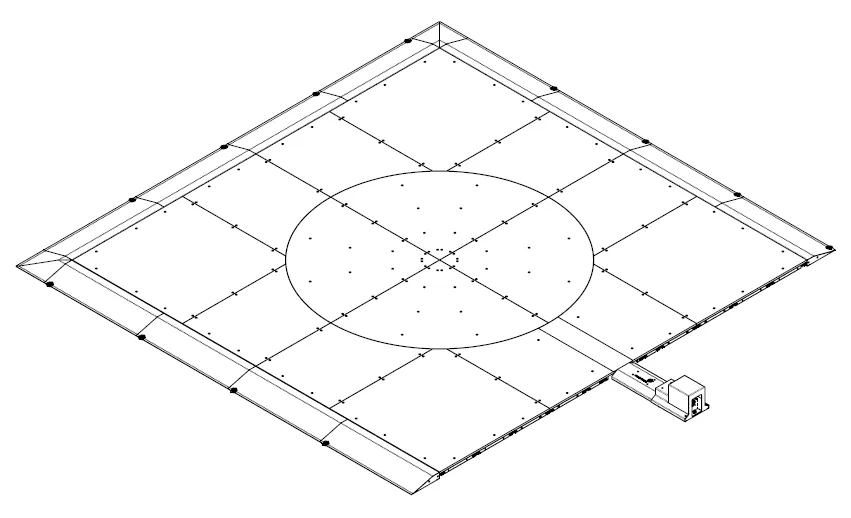
4. Posicionamiento de las cámaras
La posición de la cámara para el PhotoRobot Carpet Studio se ilustra en la siguiente infografía.
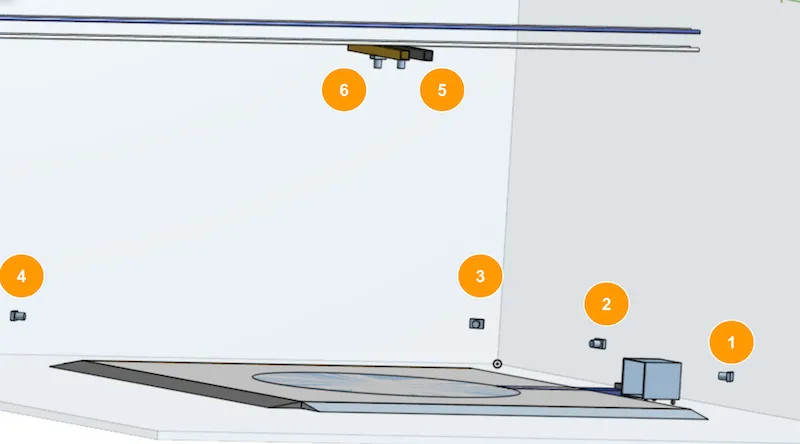
- Las cámaras 1 a 4 están instaladas a lo largo de los laterales de la plataforma.
- Las cámaras 5 y 6 están instaladas en la estructura superior.
- La cámara 7 (Canon EOS R6, no mostrada arriba) está instalada en la estructura superior en el zócalo al extremo de la extensión USB óptica, colgando a la izquierda o derecha de la estructura superior.
5. Instrucciones de operación
5.1. Encender el estudio de alfombras
5.1.1. Para alimentar la estación de trabajo Carpet Studio, comienza encendiendo el interruptor eléctrico principal.
5.1.2. A continuación, enciende la Unidad de Control.
5.1.3. Enciende la SynchroBox.
5.1.4. Enciende la LaserBox.
5.1.5. Enciende el ordenador de la estación de trabajo.
5.1.6. Inicia el software de la aplicación PhotoRobot Controls en el ordenador, ve a Ajustes, seguido de Espacios de trabajo, y selecciona tu espacio de trabajo.
5.1.7. Después de seleccionar un espacio de trabajo en CAPP, enciende el botón número 1 en el hub USB y espera hasta que la luz de la Cámara 1 cambie a verde.
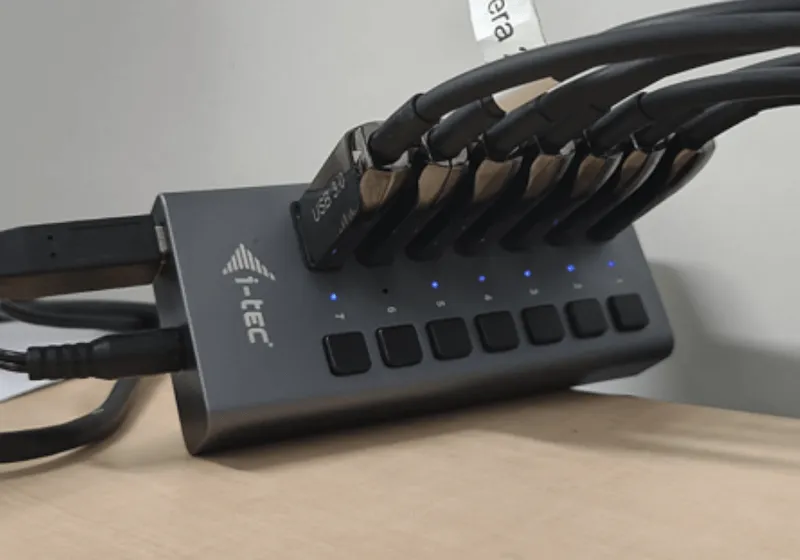
5.1.8. Enciende el botón número 2 en el hub USB y espera a que la luz de la Cámara 2 esté en verde.
5.1.9. Repite el proceso para el botón número 3, botón número 4 y botón número 5 en el hub USB. Recuerda esperar a que la luz correspondiente de la cámara cambie a verde antes de encender el siguiente número.
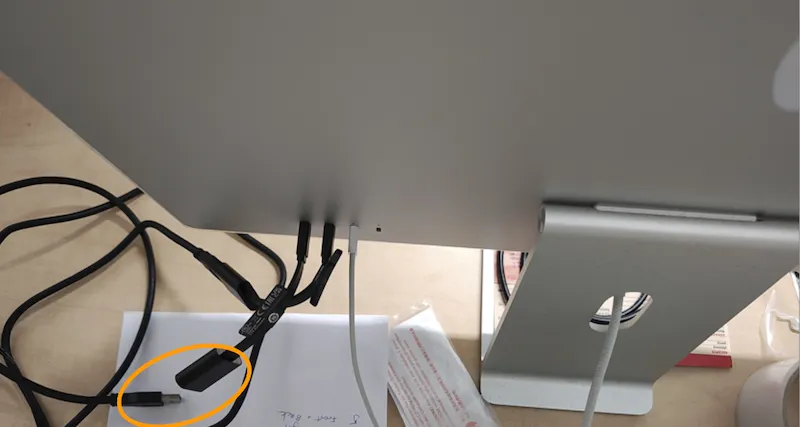
5.1.10. Conecta el conector USB de la Cámara 6 (Canon EOS 5 DSR) al enchufe al final de la extensión óptica USB y espera hasta que la luz de la Cámara 6 esté verde.
5.1.11. Después de conectar las cámaras 1 - 6, comienza la grabación de prueba.
5.1.12. Los botones número 6 y 7 en el hub USB corresponden a la Cámara 7. Conecta la cámara 7 a cualquiera de los botones 6 o 7 según la posición de la cámara. Esto dependerá de si está montado físicamente a la izquierda o a la derecha. Ten en cuenta que tanto los botones 6 como 7 del hub USB pueden permanecer encendidos sin causar ningún daño. Además, la Cámara 7 es una cámara manual y debe conectarse mediante la extensión óptica USB. La cámara se enciende usando su propio botón de encendido y apagado, no el hub USB, y solo deberías encenderla cuando la uses activamente.
5.1.13. Comienza la prueba de disparo con la Cámara 7 y luego apaga la Cámara 7 cuando esté lista para usarla.
5.2. Apagando el estudio de alfombras
5.2.1. Para APAGAR el Estudio de Alfombras, comienza apagando la Cámara 7 usando el botón de encendido en el cuerpo de la cámara.
5.2.2. A continuación, desconecta el conector USB de la Cámara 6 (Canon EOS 5 DSR) del enchufe en el extremo de la extensión USB óptica.
5.2.3. En orden, activa los botones de apagado número 5 seguido del 4, luego 3, 2 y 1 en el hub USB.
5.2.4. Suelta el software de la app PhotoRobot Controls en el ordenador de la estación de trabajo.
5.2.5. Apaga el ordenador de la estación de trabajo.
5.2.6. Apaga LaserBox.
5.2.7. Apaga la SynchroBox.
5.2.8. Apaga la unidad de control.
5.2.9. Apaga el interruptor eléctrico principal.
Nota: Si encuentras problemas durante el funcionamiento de la máquina, por favor presenta un ticket de soporte a través de https://support.photorobot. com.
PhotoRobot Viewer: Visualizador de moqueta y suelos
Desarrollado junto a Jakub Klaus de Breno Carpets, el Visualizador de Alfombras y Suelos es una solución personalizada de PhotoRobot Product Viewer. Permite la presentación digital de alfombras y alfombras en un espacio virtual. Los espectadores pueden cambiar entre diferentes diseños y colores, y colocar productos por la sala en distintos lugares del suelo. Hay navegación en miniatura para cambiar la vista interior, con botones para cambiar entre productos o cargar una vuelta de 360 grados. El visor también permite la configuración del suelo, permitiendo a los consumidores combinar objetos con diferentes diseños interiores.
6. Etiquetas de información
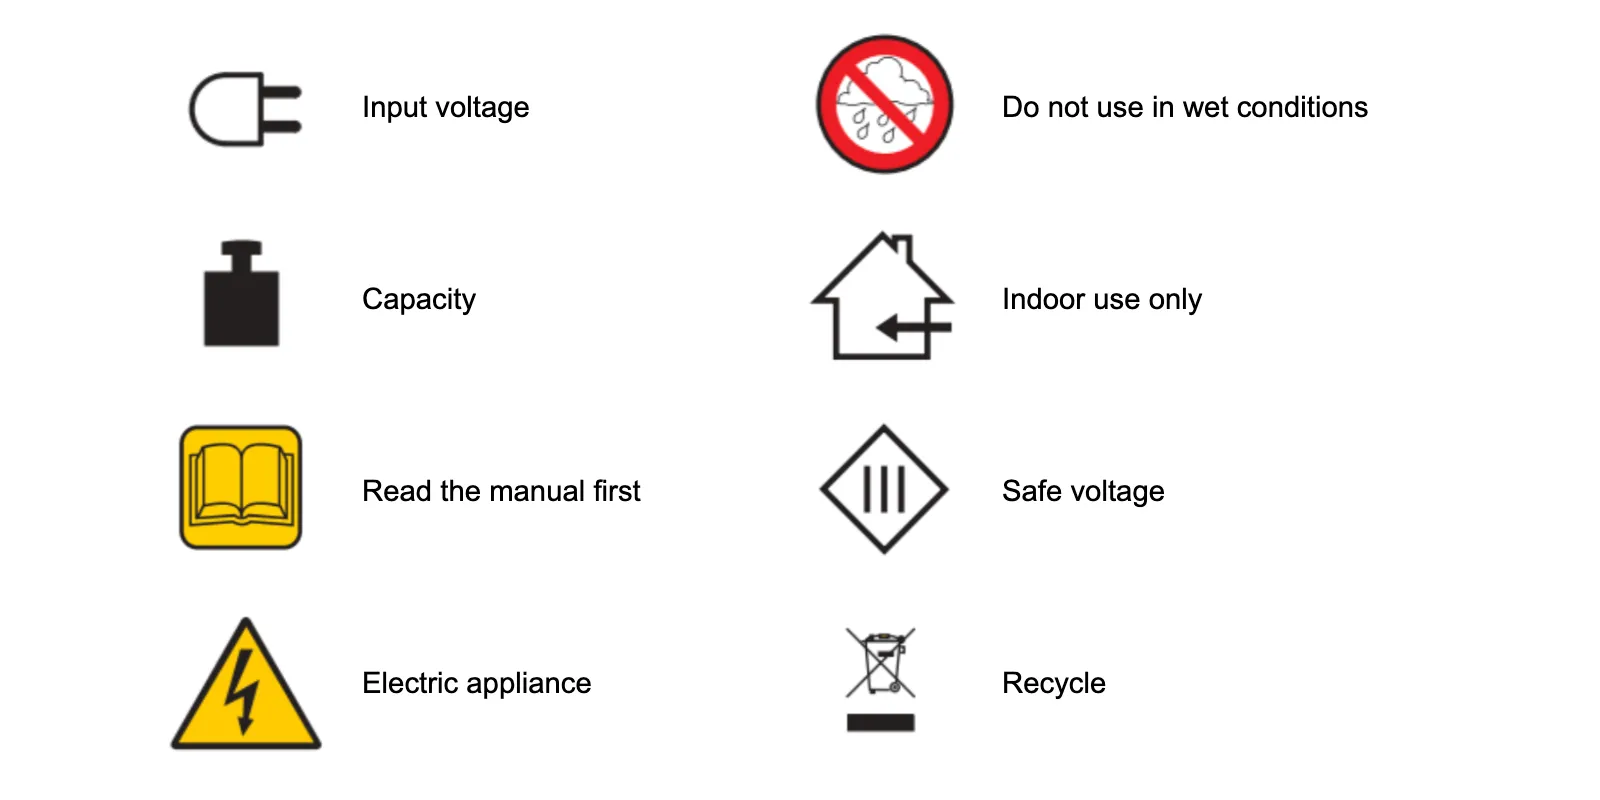
6.1. Resumen de símbolos
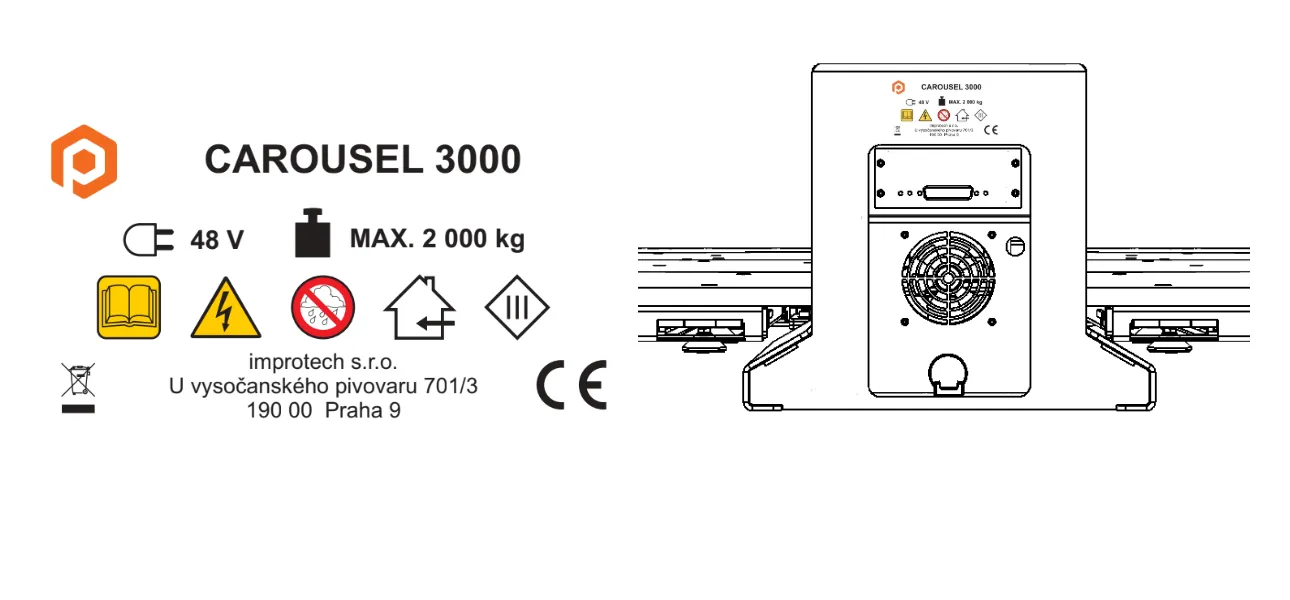
6.2. Etiquetas de Información Carousel 3000
7. Mantenimiento y revisión
El PhotoRobot Carpet Studio debe ser inspeccionado una vez al año por personal autorizado de la siguiente manera:
- Inspección de transmisión de plataforma rotativa
- Retensión y revisión de la cadena de engranajes (incluyendo ruedas dentadas)
- Inspección de los equipos principales de andén
- Inspección de la cinta de indexación (si está incluida)
- Inspección del suelo de la máquina y su soporte
- Prueba de funcionamiento del interruptor de seguridad de la cubierta del motor
- Actualizaciones de firmware (de pago o gratuitas, según el contrato de soporte)


Serie EOS Rebel


Serie EOS DSLR


Serie mirrorless EOS M


Serie PowerShot


Primer plano / Portátil

La serie EOS Rebel de Canon ofrece cámaras DSLR para principiantes con una calidad de imagen sólida, controles intuitivos y funciones versátiles. Ideales para los entusiastas de la fotografía, estas cámaras proporcionan un enfoque automático fiable, pantallas táctiles de ángulo variable y grabación de vídeo Full HD o 4K.
Conexión
Resolución (MP)
Resolución
La serie EOS DSLR de Canon ofrece imágenes de alta calidad, enfoque automático rápido y versatilidad, lo que la hace ideal tanto para la fotografía como para la producción de vídeo.
Conexión
Resolución (MP)
Resolución
La serie mirrorless EOS M de Canon combina un diseño compacto con un rendimiento similar al de una cámara réflex. Con lentes intercambiables, enfoque automático rápido y sensores de imagen de alta calidad, estas cámaras son ideales para viajeros y creadores de contenido que buscan portabilidad sin sacrificar la calidad de la imagen.
Conexión
Resolución (MP)
Resolución
La serie PowerShot de Canon ofrece cámaras compactas y fáciles de usar para fotógrafos ocasionales y entusiastas. Con modelos que van desde simples cámaras de apuntar y disparar hasta cámaras con zoom avanzado, brindan comodidad, calidad de imagen sólida y funciones como estabilización de imagen y video 4K.
Conexión
Resolución (MP)
Resolución
Las cámaras de mano y primeros planos de Canon están diseñadas para fotografía y vídeo detallados y de cerca. Compactos y fáciles de usar, ofrecen un enfoque de precisión, imágenes de alta resolución y capacidades macro versátiles, perfectas para vlogs, fotografía de productos y primeros planos creativos.


